Tree Views are certainly one of the most valuable features of Visual Studio Code. It is our visual resource for listing files from a folder or workspace; the experience of using this editor wouldn’t be the same without that.
When I started building this extension, building a Tree View for displaying GitHub Repositories was the natural thinking, and like almost everything when it comes to extension development for VS Code, there’s a well-documented API to help us.
Let’s Contribute!
The package.json manifest file is the core of any extension and has to be placed at the root of the extension directory structure. Here is where we register Contribution Points to extend functionalities. I’ll focus on the relevant ones for building a Tree View with items. Check the documentation to learn all capabilities in greater detail.
Before anything, you need a View, and you can contribute to a few built-in View Containers, such as explorer, source control management, debug and test.
To do that, I created a view named gitMarker, where its Id is gitmarkerView. All I wanted was to make my custom view with a custom icon and add it to the left bar, known as ActivityBar.
"views": {
"gitmarker": [
   {
      "id": "gitmarkerView",
      "name": "",
      "contextualTitle": "Favorite Repositories"
   }
]"viewsContainers": {
"activitybar": [
{
"id": "gitmarker",
"title": "GitMarker",
"icon": "resources/gitmarker.svg"
}
]
}
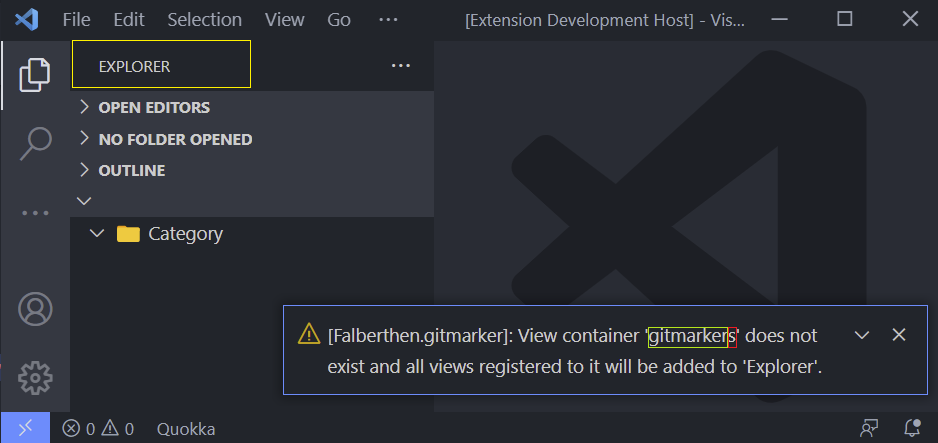
If you mistype the view’s object name (do not confuse with the name attribute used for being shown, and I left it empty on purpose), the activityBar won’t be able to reach your view, and it will be rendered automatically on explorer View Container at the moment you activate your extension, and an error message will be shown.
e.g. "id": "gitmarkers"
Last but not least, I registered the view to the activationEvent onView:${viewId}. Check for more details.
"activationEvents": [
   "onView:gitmarkerView"
]
Providing data
Before creating the actual Tree View, we need to have a DataProvider. It will act as a data source for the Tree View. DataProviders implement the generic vscode.TreeDataProvider. Following the Tree View API steps, I created the TreeDataItemProvider class, where T is my TreeDataItem class that extends vscode.TreeItem.
The TreeDataItemProvider class has the _onDidChangeTreeData property of vscode.EventEmitter type. Thanks to that, I can refresh the Tree View by calling the refresh() method, which notifies all subscribers. Check the documentation to learn more details about the getChildren method.
The TreeDataItem class defines some behavior and properties I implemented to differentiate Categories and GitHub Repositories. It also defines each tree node’s icon and Collapsible State.
Planting a Tree
Now it’s time to join all together finally. To create a TreeView, you can instantiate a generic vscode.TreeView class by calling the vscode.window.createTreeView function. I created the @injectable TreeViewManager service for handling that. The constructor starts with the code below, which pretty much sums up all we saw.
this.dataProvider = new TreeDataItemProvider();
this.treeView = vscode.window.createTreeView(GITMARKER_VIEW, {
   showCollapseAll: true,
   treeDataProvider: this.dataProvider,
   canSelectMany: true
});
Check the complete code, and this is it! In a further chapter, I will show you how this service is being injected into BookmarkManager service and, the techniques I used for implementing it.


