In the previous post, I talked about persisting domain events into the event store, projecting and reading them, all using MartenDB. Now it’s time to wrap up everything I’ve covered so far, add any missing infrastructure, and finish the backend.
- Part 1 - EcommerceDDD overview
- Part 2 - Strategic and Tactical Design
- Part 3 - Domain events and Event Sourcing
- Part 4 - Implementing Event Sourcing with MartenDB
- Part 5 - Wrapping up infrastructure (Docker, API gateway, IdentityServer, Kafka)
- EcommerceDDD++: Streamlining API Client Generation with Kiota and Koalesce
Docker containers
I couldn’t wrap up this series without highlighting the importance of providing an out-of-the-box developer experience. All you need to run the project is to have Docker installed — no extra setup, no dependency hell.
If you’re new to Docker, it’s the most widely used open-source platform for building, deploying, and managing containerized applications. In this project, I used Docker Compose to orchestrate containers for each microservice. I also leveraged public Docker images for things like PostgreSQL, Kafka and related services.
Once everything is defined in the docker-compose.yml file, spinning up the full environment is as simple as running:
1
2
# Backend only — starts all microservices, databases, Kafka, and infrastructure:
 $ docker-compose up
or
1
2
# Backend + Frontend — also builds and serves the Angular SPA at http://localhost:4200:
 $ docker compose --profile frontend up
Ocelot - API Gateway
Given our microservices architecture, we have multiple APIs — typically one per service. From the frontend (SPA) perspective, calling each service individually is not only impractical but also undesirable. Each API lives on a separate port and inside a different Docker container.
We don’t want the SPA to know anything about internal infrastructure, such as which microservice handles what or where each microservice runs. Instead, we use an API Gateway to abstract this complexity.
For this, I chose Ocelot, a lightweight API Gateway for .NET. It allows us to centralize all routing behind a single entry point: http://localhost:5000. That’s the only address the SPA needs to be aware of.
The routes are defined in ocelot.json, where I used the Docker service name as the downstream host. Here’s the current structure:
1
2
3
4
5
6
7
8
9
10
11
12
13
14
├── Crosscutting
│   ├── EcommerceDDD.ApiGateway
│   │    └── Ocelot
│   │      └── ocelot.json
│   │       └── ocelot.accounts.json
│   │       └── ocelot.customerManagement.json
│   │       └── ocelot.global.json
│   │       └── ocelot.inventoryManagement.json
│   │       └── ocelot.orderProcessing.json
│   │       └── ocelot.paymentProcessing.json
│   │       └── ocelot.productCatalog.json
│   │       └── ocelot.quoteManagement.json
│   │       └── ocelot.shipmentProcessing.json
│   │       └── ocelot.signalr.json
ocelot.customerManagement.json
⚠️ The ocelot.json is a bundle of all these individual configuration files, merged together. Organizing routes through smaller files is a good way to keep it all atomic and organized. The automatic merge is done in the Program.cs like this:
1
2
3
4
5
6
7
8
9
10
11
builder.Configuration
	.SetBasePath(Directory.GetCurrentDirectory())
	.AddJsonFile("Ocelot/ocelot.json", optional: false, reloadOnChange: true)
	.AddOcelot(
		folder: "Ocelot",
		env: builder.Environment,
		mergeTo: MergeOcelotJson.ToFile,
		primaryConfigFile: "Ocelot/ocelot.json",
		reloadOnChange: true
	)
	.AddEnvironmentVariables();
Refer to Ocelot’s official documentation for more options and advanced configurations.
EcommerceDDD.IdentityServer
When registering a new customer, the system requires an email and password. These are authentication concerns — not part of the customer’s domain model, and are handled in a separate project: Crosscutting/EcommerceDDD.IdentityServer.
ASP.NET Core Identity
ASP.NET Core Identity: It is an API that supports user interface (UI) login functionality. Manages
users,passwords,profile data,roles,claims,tokens,email confirmation, and more.
I configured it using the same PostgreSQL instance used elsewhere in the project. Migrations are generated using IdentityApplicationDbContext:
1
dotnet ef migrations add InitialMigration -c IdentityApplicationDbContext
You can find these migrations in the Database/Migrations folder.
Duende IdentityServer
The most flexible and standards-compliant OpenID Connect and OAuth framework for ASP.NET Core.
Duende IdentityServer is well-suited for authentication and can be easily integrated with ASP.NET Core Identity. Check out the Program.cs below and notice how I made it support the application using its .AddAspNetIdentity extension method:
Two more migrations were added to complete the persistence setup required by IdentityServer:
1
2
dotnet ef migrations add InitialIdentityServerConfigurationDbMigration -c ConfigurationDbContext -o Migrations/IdentityServer/ConfigurationDb
dotnet ef migrations add InitialIdentityServerPersistedGrantDbMigration -c PersistedGrantDbContext -o Migrations/IdentityServer/PersistedGrantDb
With both migrations applied when the project runs, we should have this complete database structure:

Issuing tokens
Once everything is running, the ecommerceddd-identityserver container is available at http://localhost:5001. It exposes an AccountsController used to create users and request tokens.

The controller uses an ITokenRequester service that wraps the logic of requesting user tokens and application tokens. It simplifies both authentication and service-to-service communication.
ITokenRequester relies on TokenIssuerSettings.cs, a configuration record matching the section in appsettings.json within each microservice, and from there, it can gather important information for issuing tokens:
User Token
1
2
3
4
5
6
"TokenIssuerSettings": {
  "Authority": "http://ecommerceddd-identityserver",
  "ClientId": "ecommerceddd.user_client",
  "ClientSecret": "secret234554^&%&^%&^f2%%%",
  "Scope": "openid email read write delete"
}
Application Token
1
2
3
4
5
6
 "TokenIssuerSettings": {
   "Authority": "http://ecommerceddd-identityserver",
   "ClientId": "ecommerceddd.application_client",
   "ClientSecret": "secret33587^&%&^%&^f3%%%",
   "Scope": "ecommerceddd-api.scope read write delete"
 }
User tokens are generated during the authentication process for a specific user. They represent the user’s identity and contain information such as the user ID, claims, and other data, with a shorter lifespan. Application tokens, by contrast, authenticate the application itself rather than a specific user. Since they are not tied to individual user sessions, they carry a longer lifespan — making them well-suited for machine-to-machine communication.
Scopes, Roles, and Policies
The scopes defined in the token settings are more than just metadata — they directly control what operations the token bearer is authorized to perform. Each API endpoint is protected by [Authorize] attributes that enforce access rules based on roles and policies.
For example:
1
	[Authorize(Roles = Roles.Customer, Policy = Policies.CanRead)]
This ensures that only authenticated users with the Customer role and CanRead policy can access the endpoint. I also defined CanWrite and CanDelete, and applied where it makes sense.
For machine-to-machine communication, application tokens are restricted similarly:
1
	[Authorize(Roles = Roles.M2MAccess)]
By combining scopes, roles, and policies, you can create a fine-grained security model that controls access both at the user level and the system level. These policies are typically defined using ASP.NET Core’s AddAuthorization setup in the Program.cs of each microservice.
⚠️ Important: The ClientSecret values above are hardcoded for simplicity — this is a demonstration project. In a real application, secrets should never be stored in appsettings.json. Use environment variables, .NET Secret Manager, or a dedicated secrets management service such as Azure Key Vault instead.
Kafka topics
Apache Kafka is an open-source distributed event streaming platform used by thousands of companies for high-performance data pipelines, streaming analytics, data integration, and mission-critical applications.
One last but essential aspect of the infrastructure is allowing different bounded contexts to communicate using a message broker. I mentioned integration events in earlier posts. They implement the IIntegrationEvent interface, which inherits from EcommerceDDD.Core.Domain.INotification.
I’m using Kafka as a message broker here, but there are good other options, such as RabbitMQ, Azure Service Bus and others.
The idea is simple. Some microservices are producing integration events, while others are consuming them. In EcommerceDDD.Core.Infrastructure/Kafka, you will find a KafkaConsumer class. It is registered in Program.cs of the EcommerceDDD.OrderProcessing microservice and subscribes to a list of topics defined in appsettings.json.
When an event reaches the topic, the consumer receives it from the stream and deserializes it into a corresponding integration event, which OrderSaga.cs is configured to handle.
1
2
3
4
5
public class OrderSaga :
    IEventHandler<OrderPlaced>,
    IEventHandler<OrderProcessed>,
    IEventHandler<PaymentFinalized>,
    IEventHandler<ShipmentFinalized>
Saga resilience and Kafka at-least-once delivery
KafkaConsumer uses EnableAutoCommit = false, meaning the offset is only committed after the handler completes successfully. If a saga step fails — for example, because a downstream service is temporarily unavailable — the handler throws an InvalidOperationException (via a ThrowIfFailed helper), the consumer never calls Commit, and Kafka redelivers the message on the next poll until it succeeds.
This means the system self-heals automatically: if PaymentProcessing goes down mid-flow, the saga retries the message every ~500ms until the service comes back, with no manual intervention needed.
To make this retry loop safe, command handlers guard against duplicate execution. For example, RecordPaymentHandler checks whether the order is already Paid before applying the event — so replayed messages are treated as no-ops rather than causing domain exceptions.
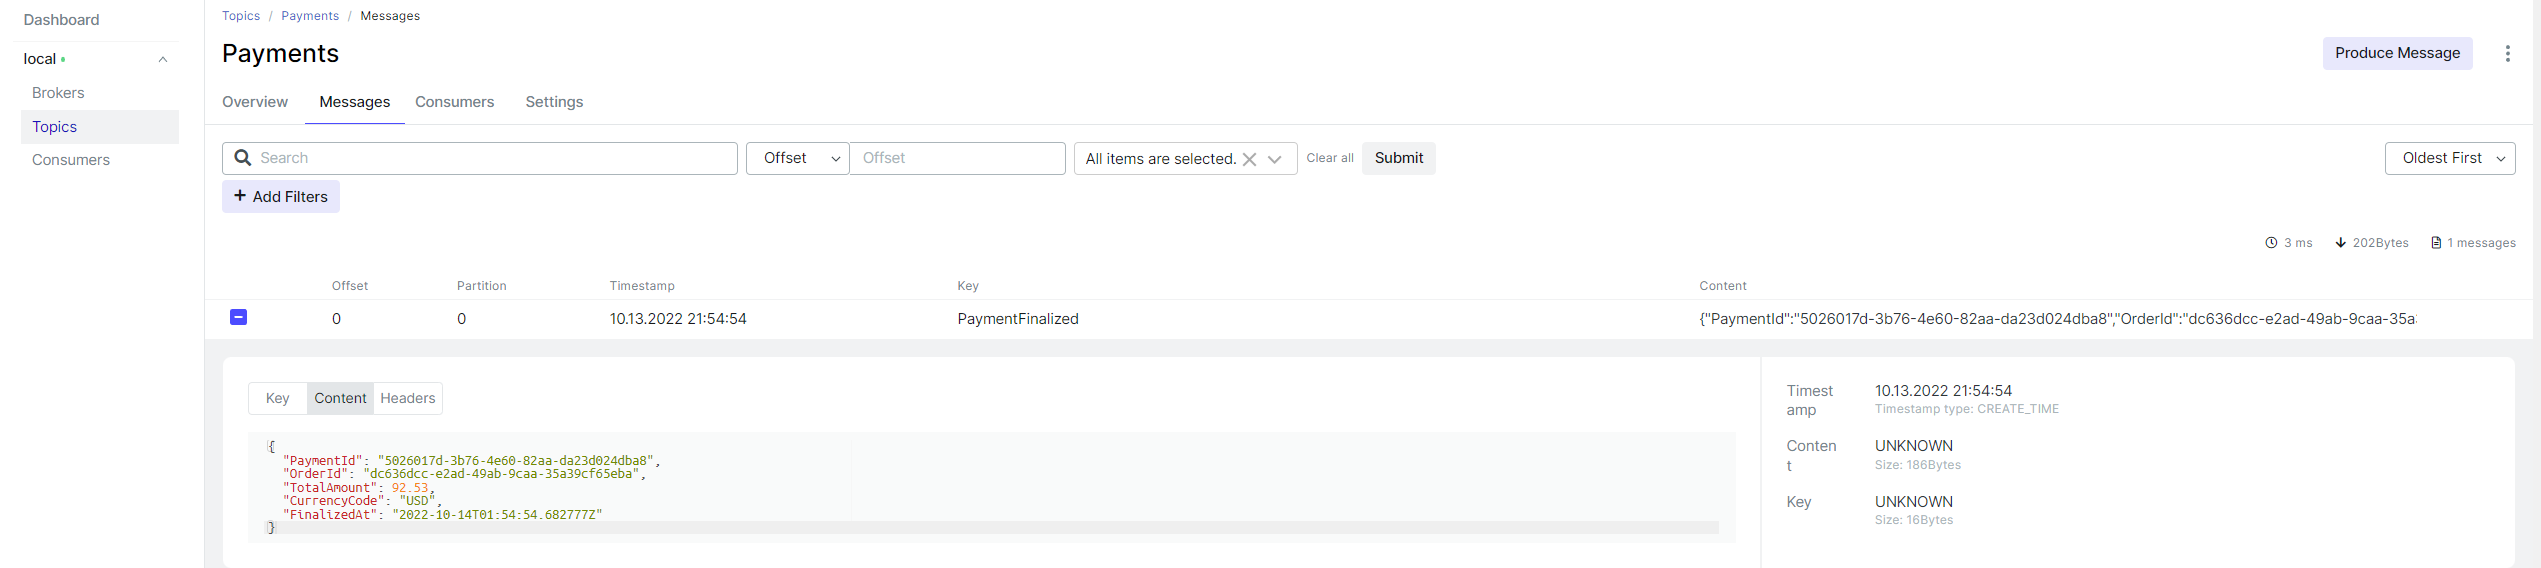
Now back to Kafka — when using kafka-ui, you can easily see the existing topics and check their messages.

How to ensure transactional consistency across microservices?
When using events to communicate across services, consistency becomes crucial. If a message isn’t published, the entire workflow might break.
To handle this, I implemented the Outbox Pattern in MartenRepository.cs:
1
AppendToOutbox(INotification @event)
Unlike domain events, which are handled by AppendEventsAsync, integration events are stored in a separate outbox table — but still within the same transaction.
Initially, I had a KafkaConsumer background service that was constantly polling messages put into the outbox table for each microservice, but I changed everything to use CDC (Change Data Capture) with Debezium, which watches the table and automatically publishes new events to Kafka.
I wrote an entire post about Consistent message delivery with Transactional Outbox Pattern with details for using this technology. Remember to check it out!
SAGA
The SAGA pattern coordinates the multi-step ordering workflow across bounded contexts using the integration events and Kafka infrastructure covered above. The full walkthrough — including the happy path and compensation flows, covered in Part 3.
Final thoughts
This post wrapped up the backend by stitching together the infrastructure that makes the architecture actually run in practice: Docker to eliminate setup friction, Ocelot to give the frontend a clean and unified entry point, IdentityServer to handle authentication and machine-to-machine authorization, Kafka to decouple bounded contexts through integration events, and the Outbox Pattern with Debezium to ensure those events are delivered reliably even under failure.
None of these pieces are free. Each one adds operational complexity, and microservices demand that you embrace it deliberately. The payoff — independent deployability, bounded failure domains, and per-service scalability — is real, but only when the domain is complex enough to justify the cost. For smaller systems, a well-structured monolith will serve you better.
What makes this stack satisfying is how the pieces compose: the Outbox Pattern guarantees events reach Kafka even if a service crashes mid-transaction, and Kafka’s at-least-once delivery ensures consumers will eventually process them. Together, they form a resilience loop that self-heals without manual intervention.
With the backend fully assembled, we’re ready for the next and final post, where I’ll cover the Angular SPA that brings all of this to life. See you there!
Links worth checking
- Docker
- Docker Hub
- IdentityServer
- Ocelot
- ASP.NET Core Identity
- Implementing event-based communication between microservices
- Creating And Validating JWT Tokens In C# .NET
- Domain events
- Ubiquitous language
- Bounded context
- SAGA